
Jewelry Photography Tutorials: Use Window Light at Home
Jewelry & Accessories · CraftToCamera
A useful jewelry set explains design, finish, fastening and scale, with reflections arranged deliberately.
You turn a handmade earring toward the window and it suddenly looks beautiful. Turn it a little farther and the metal goes dark, or a white reflection covers the stone. That’s a useful clue: the piece is showing you what it reflects. The light isn’t the only thing you can move.
Let’s give each photo a clear purpose. I’d make the design easy to recognize first, then photograph the finish, fastening and scale separately. You can do this beside a window with a quiet background. The important part is noticing which angle explains the jewelry, rather than asking one sparkling close-up to answer every question.
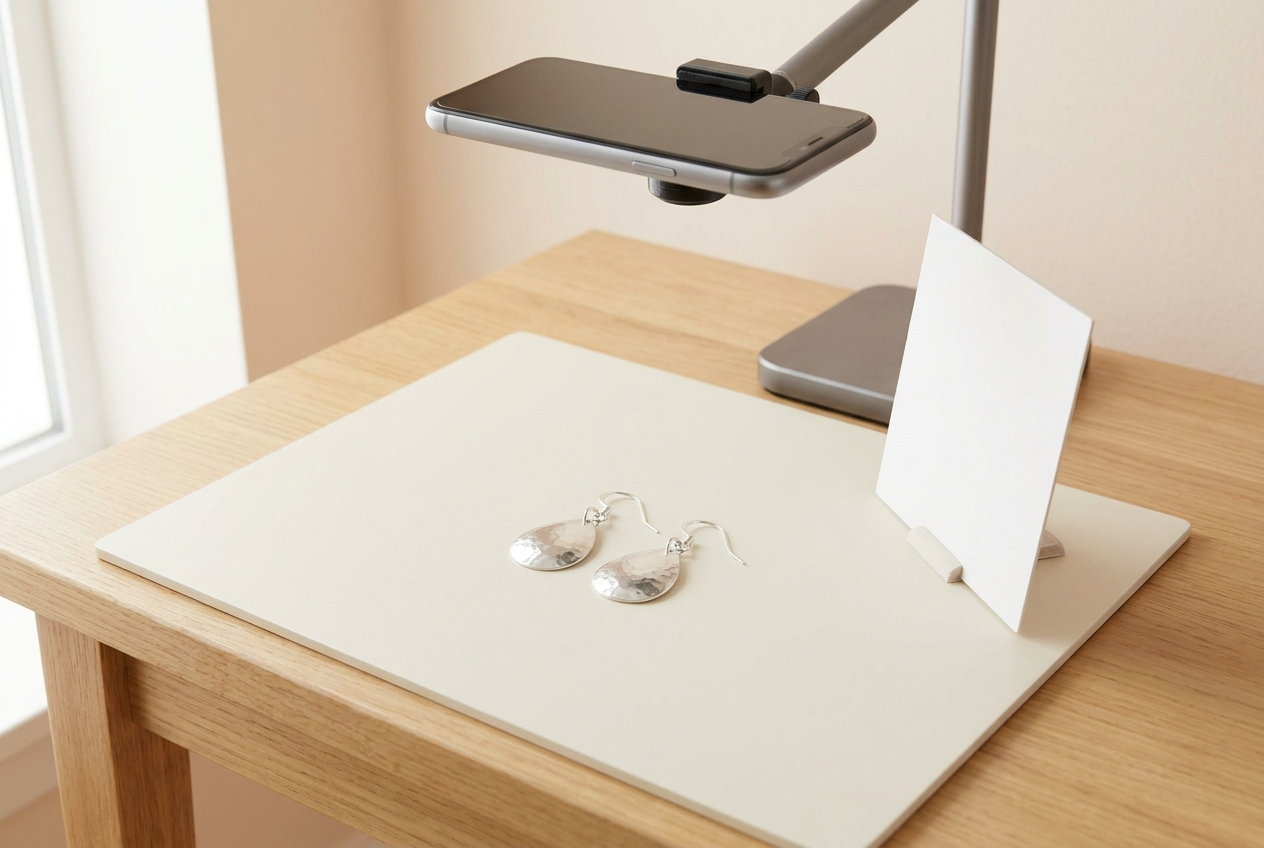
Choose the information your photographs need to show
Start by looking at the piece as someone who has never held it. Is the design symmetrical? Does a pendant hang below a clasp? Are the earrings studs or hooks? A close view of a gemstone may attract attention, but it cannot answer all those questions. Write down the features that make the item understandable before arranging decorative objects.
For a pair of earrings, I would plan a clear pair view, an individual detail, the backs or fastenings, and a scale image. For a necklace, I would add the complete chain arrangement and the clasp. For a bracelet, the opening and the shape when fastened may matter more than another cropped photograph of the center.
Think about what is included in the purchase. If you photograph three pieces together but sell them separately, explain that in the accompanying information. A coordinated arrangement should not accidentally suggest a set. The photograph and product description need to tell the same story.
Prepare small surfaces before magnifying them
Dust and fingerprints become more noticeable when you move close to a small object. Check the piece under the light you intend to use, then clean it with a method appropriate for its materials. Delicate coatings, porous stones and mixed materials should not be treated as though every jewelry cleaner suits them.
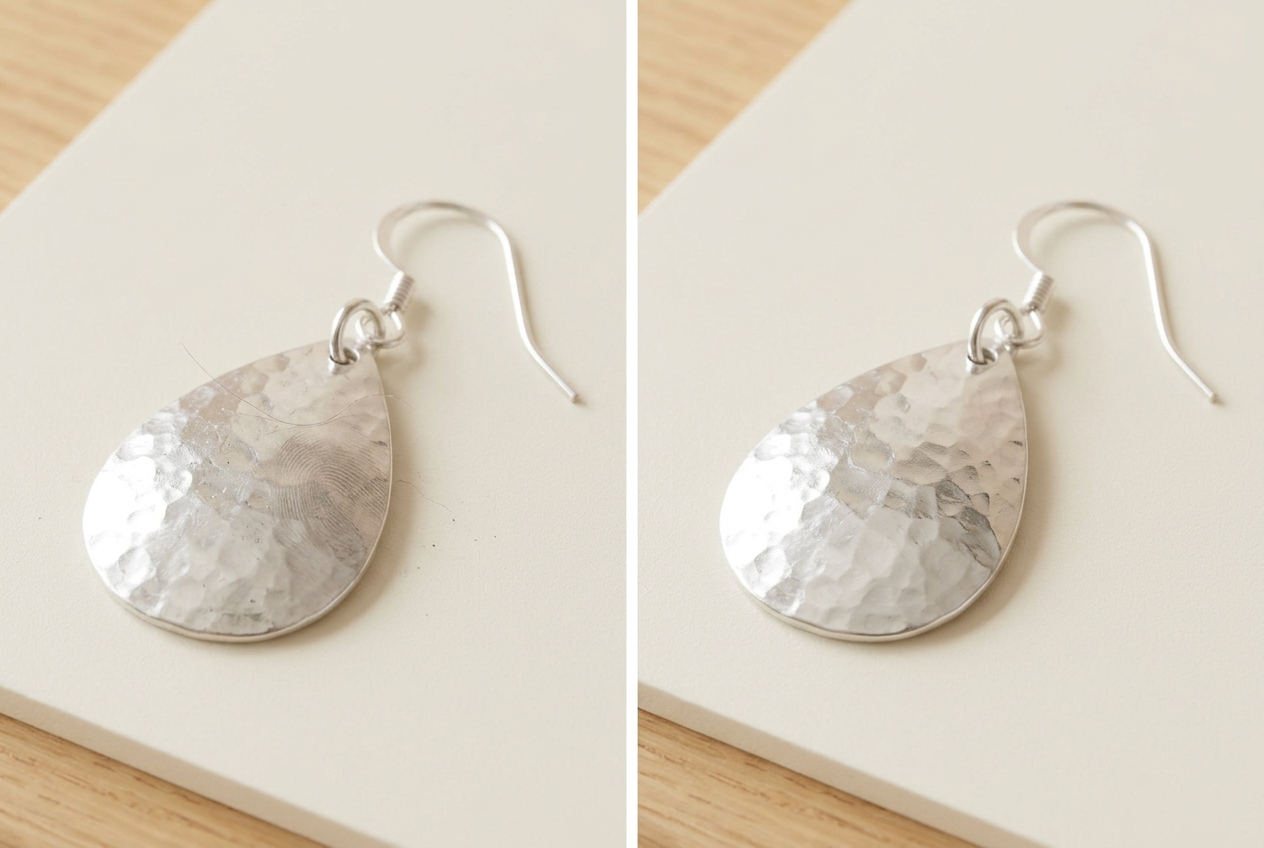
Lay out chains carefully without pulling them into an unnatural shape. Untwist hooks, position a pendant so it faces the camera, and make sure a pair sits at comparable angles. These small adjustments help the viewer compare the design rather than wondering whether an uneven arrangement is part of the item.
Check your background too. A tiny fiber beside a stone can become the most noticeable line in a close photograph. Remove loose dust before recording several views. I prefer spending a minute preparing a small area to trying to repair every image afterward, especially when an edit could accidentally change the product’s edge.
Find a useful position beside the window
Begin outside a direct sunbeam. Position the table near the window and place the jewelry where the light comes from the side or slightly behind the camera. Take a test photograph, then rotate the piece in small steps. Watch the metal, not just the brightness of the whole image.
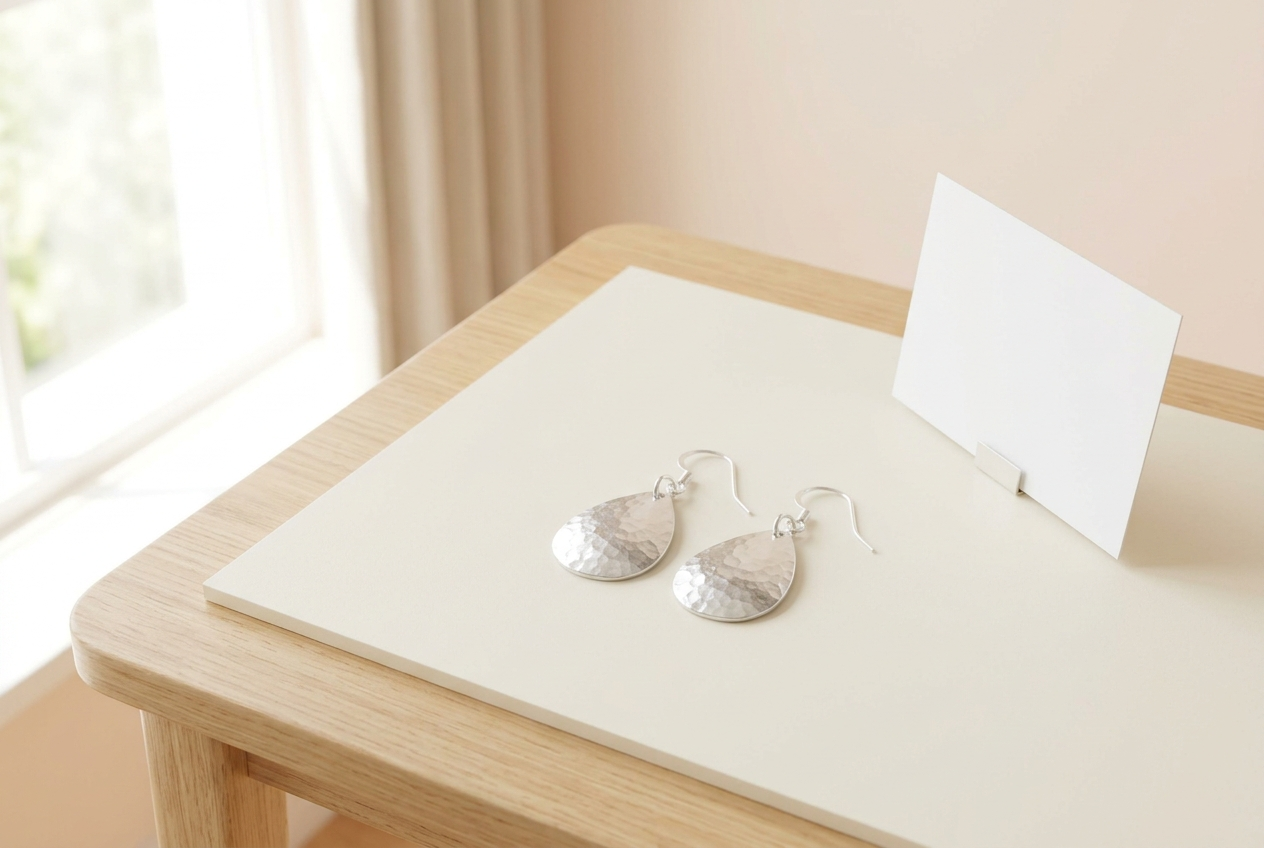
The best position is the one that explains the shape and finish you are showing. A silver curve needs some change between light and dark to remain visibly curved. If everything reflects a bright white surface, the piece can lose its edges. If everything reflects a dark room, it may look much darker than it does in person.
Use a piece of plain white card beside the setup to simplify a busy reflection or gently lift a shadow. Move it while watching the camera preview. Stop when it helps the outline read. You are arranging what the metal reflects, so a small change in the card’s position can matter more than making the entire room brighter.
Handle reflections without removing the character of the metal
A reflective finish should still look reflective. The aim is to keep a large bright patch from covering a clasp, engraved mark or stone, rather than eliminating every highlight. Compare a front view with a slightly angled view. Sometimes the second angle makes the design clearer without changing anything else in the setup.
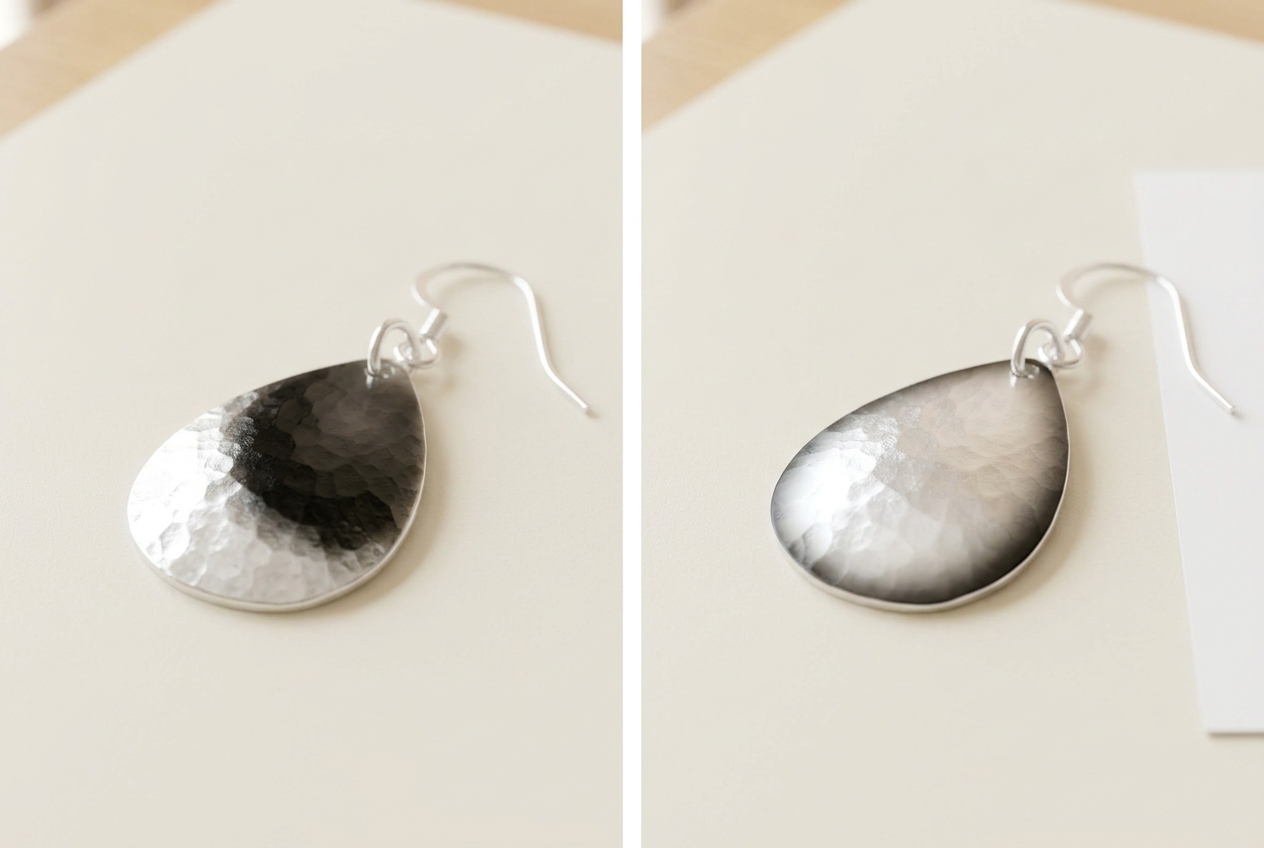
Look for recognizable objects in the reflection. A colorful phone case, a bright sleeve or a dark rectangular camera can appear in polished surfaces. Move the camera a little, simplify the surroundings or shift the piece. Avoid surrounding the product with decorative objects before you have solved the basic reflection, because every extra object can introduce another reflected color.
If a stone and its setting need different angles, photograph them separately. Use the main image to explain the complete piece and a supporting close view to show translucency, surface pattern or a deliberate texture. Those pictures can complement each other without pretending that a single lighting position reveals every characteristic equally well.
Keep the important details sharp
Small subjects tempt us to push the phone closer and closer. If the image stops becoming sharp, move back. Every camera has limits on how close it can focus, and phones may behave differently depending on which camera or mode is active. Test the actual saved photograph instead of relying only on the live preview.
For a flat pair of earrings, keep the pieces in a similar plane when you want both sharp. For a curved bracelet, decide whether the main feature is the front decoration, the opening or the whole form. Changing the camera angle can reduce how much depth you need to cover in one photograph.
Stabilize the phone with a support and use a timer if pressing the shutter moves it. Take a small series, but review before continuing to another arrangement. A dozen nearly identical soft images will not give you more choices than one carefully focused photograph. When the detail matters to a purchase, clarity is more valuable than dramatic blur.
When following jewelry photography tutorials, compare the design view with the reflection detail; keep enough shine to describe the metal without letting a highlight cover the stone or fastening.
Build a small set with distinct views
| View | What it explains | What to check |
|---|---|---|
| Complete design | Shape and arrangement | Nothing important is cropped |
| Close detail | Stone, texture or finish | Focus is on the feature |
| Back or fastening | Construction and closure | The mechanism is visible |
| Scale view | Approximate proportions | Measurements support the image |
| Packaging | What arrives with the order | Props are clearly separate |
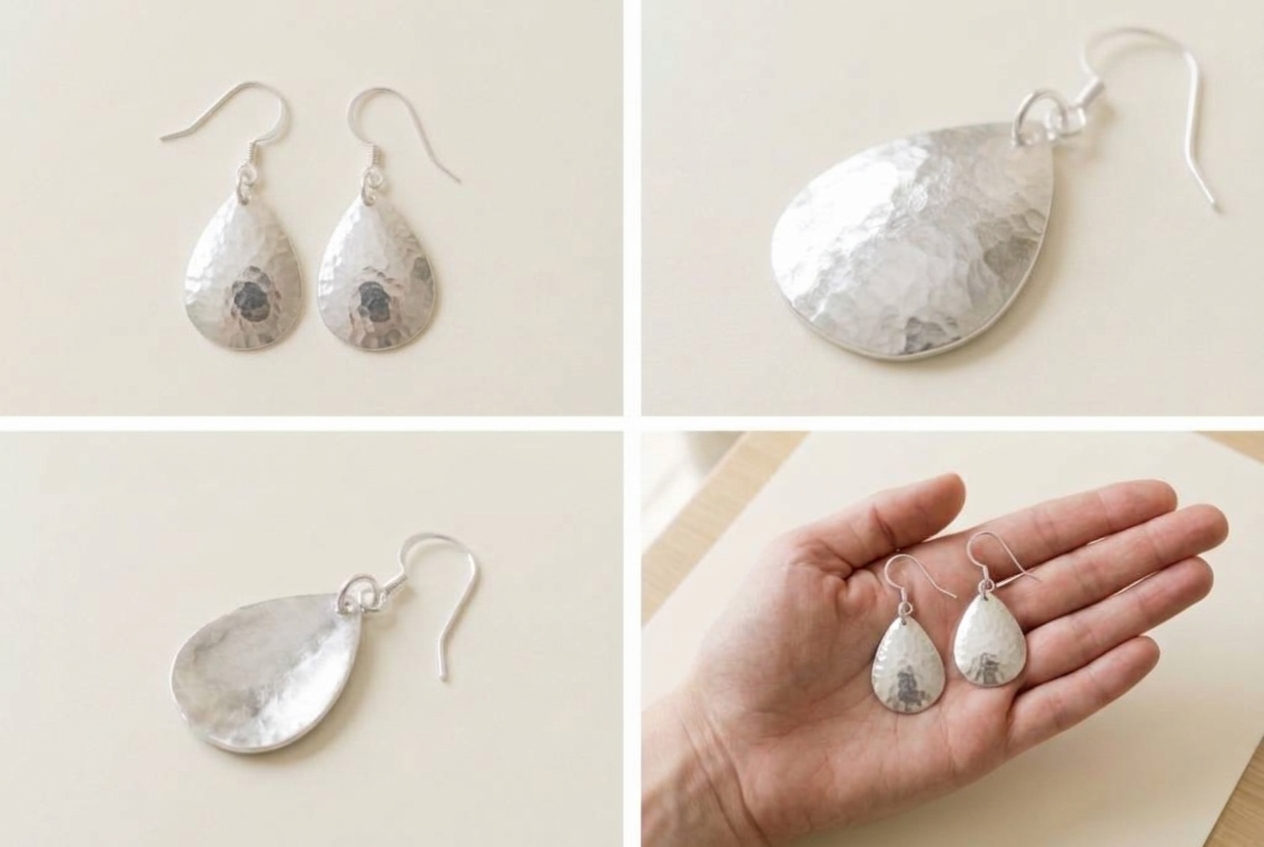
Start with the complete design and keep enough space around the chain or pair. Then move to the feature that gives the jewelry its character. A hammered surface needs light that shows the small changes in the metal; an engraved detail needs an angle where the lettering can actually be read.
For scale, include dimensions in the listing even if you also photograph the piece in a hand or worn. Hands and bodies vary, and perspective changes apparent size. If you use a worn view, keep hair, fingers and clothing from covering the part the customer needs to judge.
Common mistakes in window-light jewelry photography
Using sparkle as the only subject. A bright highlight can be attractive while hiding the overall design. Keep one clear, complete image in the set and use the sparkle view as a supporting detail.
Overexposing pale metal. If the lightest areas become featureless white, the edge and surface can disappear. Adjust the light or exposure and check the metal itself. A bright background is not a reason to lose the product’s outline.
Adding too many styling materials. Crystals, shells, flowers and fabric can overwhelm a small piece. Start with one background and add a prop only when it helps explain the collection or intended presentation. Keep a plain alternative available.
Changing the stone color to match the background. Editing should make the photograph more faithful, not coordinate the product with a palette. Compare color across the full set. A customer should recognize the same item in the main image, detail and packaging view.
Edit the set as a consistent group
Begin with straightening and a useful crop. Check whether the same metal looks similar across all the photographs, then make small brightness and color adjustments where needed. Resist making each frame independently dramatic if that creates five different versions of the same piece.
Zoom into edges while editing. Strong sharpening can create bright outlines or make a smooth finish look rough. Heavy noise reduction can erase small engraved marks or surface character. If the original photograph is not detailed enough, a clearer capture is a better solution than increasingly strong correction.
Keep an unedited original and export a separate version for the intended placement. Leave some breathing room around the design so a different crop does not remove the clasp or the end of an earring. Preview the actual image at the size people will first encounter, because tiny lettering and delicate details can disappear in a small card.
Frequently asked questions
Do I need a lightbox for handmade jewelry?
A lightbox can be useful in some setups, but it is not required to start. A window, plain background and white card let you explore light direction and reflections. Work on those relationships before deciding whether more equipment solves a specific problem.
Why does silver look almost black in my photo?
It may be reflecting a dark part of the room or the camera. Change the jewelry’s angle and watch the reflection. Bringing a white card into the reflected area can help, while preserving enough darker tone to describe the shape.
Should I photograph jewelry on a person?
A worn image can explain proportions and how a piece hangs. It should support clear product photographs, not replace the back, fastening and detail views. Include measurements so the customer is not relying on the model’s proportions alone.
How can I photograph a matching pair evenly?
Place both pieces on the same surface, compare their angles through the camera, and check spacing before taking the picture. If one sits higher or farther away, it can look different in size even when the pair matches.
Can I remove a reflection in editing?
A minor distracting reflection may be correctable, but avoid changing the actual finish or hiding a feature. Repositioning the light, camera or jewelry usually gives a more believable starting image. Keep the original for comparison.
Plan the next piece while the setup is ready
Once you have a useful window position, note the time, background and card placement. Photograph another piece with similar materials before dismantling everything. This gives your collection a coherent look while leaving room for a different detail angle when the design needs it.
The CraftToCamera Handmade Jewelry Photography Kit on Etsy offers 20 photography setups and planning resources. Choose the setup that suits the piece you are showing, then build your own complete, detail, fastening and scale views. The listing contains the current files and full contents.
Further reading: Nikon’s jewelry photography examples.